HTML Structure
Background and color
You can change the background by adding class into the tag <body>
<body class="bg_pattern_1">
<body class="bg_pattern_2">
<body class="bg_pattern_3">
To edit basic Classter color scheme you need to add style table before closing tag </head>, as well as in "general.css" you need to replace the initial color #dedede with the color you need.
<link rel="stylesheet" href="css/general.css" type="text/css" media="all" />
Image background

You can change the background by adding class into the tag <body>
<body class="bg_image_1">
<body class="bg_image_2">
<body class="bg_image_3">
<body class="bg_image_4">
<body class="bg_image_5">
<body class="bg_image_6">
Sidebar widget example
<aside class="widgetWrap widget widget_recent_comments">
<h5 class="title">Recent Comments</h5>
<ul id="recentcomments">
<li class="recentcomments">
<span class="comment-author-link">TRX_admin</span>
on
<a href="#comment-25">Kevin Francis Gray quis</a>
</li>
<li class="recentcomments">
<span class="comment-author-link">TRX_admin</span>
on
<a href="#comment-24">Offi Molded Ply W Magazine</a>
</li>
<li class="recentcomments">
<span class="comment-author-link">TRX_admin</span>
on
<a href="#comment-22">New Post With Image</a>
</li>
</ul>
</aside>
Single post example
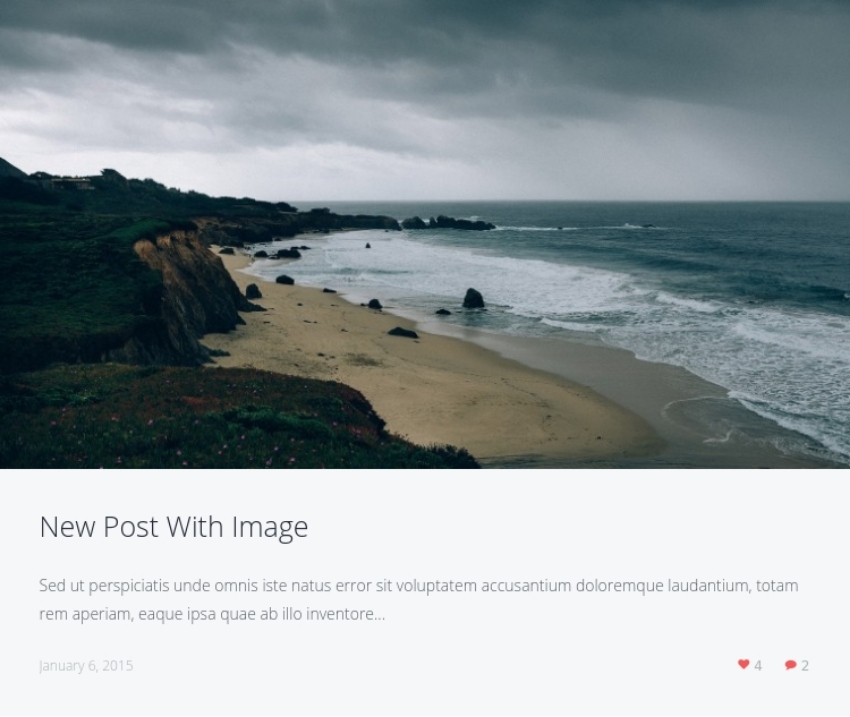
<article class="bg_post post">
<div class="isotopePadding bg_post">
<div class="thumb hoverIncrease hoverTwo inited"
data-link="#" data-image="img/shore.jpg" data-title="New Post With Image">
<img alt="New Post With Image" src="img/shore-760x420.jpg">
<span class="hoverShadow"></span>
<div class="wrap_hover">
<a href="img/shore.jpg" title="New Post With Image" class="inited p-view
prettyPhoto" data-gal="prettyPhoto[gal]" rel="magnific">
<span class="hoverIcon"></span>
</a>
<a title="New Post With Image" href="#">
<span class="hoverLink"></span>
</a>
</div>
</div>
</div>
<div class="post_wrap">
<h4>
<a href="#">New Post With Image</a>
</h4>
<div class="post_format_wrap postImage">
Sed ut perspiciatis unde omnis iste natus error sit voluptatem accusantium
doloremque laudantium, totam rem aperiam, eaque ipsa quae ab illo inventore...
</div>
<div class="bog_post_info infoPost">
<span class="datePost">
<a href="#" class="post_date">January 6, 2015</a>
</span>
<span class="commentPost">
<a class="fa fa-comment" title="Comments - 2" href="#">2</a>
</span>
<span class="likePost">
<a class="fa fa-heart" title="Likes - 4" href="#">4</a>
</span>
</div>
</div>
</article>
Typography

Image size can be changed by adding one of the classes "thumbnail", "medium", "large"; for alignement (positioning) it would be "alignleft", "alignright", "aligncenter", "alignnone".
<div class="sc_image sc_image_shape_square medium floatleft">
<img src="img/picjumbo_hight.jpg" alt="">
<figcaption>
<span>This image aligned left</span>
</figcaption>
</div>
Highlight
For light effect we should use classes "sc_highlight_style_1", "sc_highlight_style_2", "sc_highlight_style_3".
<p> <span class="sc_highlight_style_1">Ut enim ad minim</span> veniam, quis nostrud exercitation ullamco laboris nisi ut aliquip ex ea commodo consequat. <span class="sc_highlight_style_2">Duis aute irure</span> dolor in reprehenderit in voluptate velit esse cillum dolore eu fugiat nulla pariatur. <span class="sc_highlight_style_3">Excepteur sint occaecat</span> cupidatat non proident, sunt in culpa qui officia deserunt mollit anim id est laborum. </p>
Portfolio example
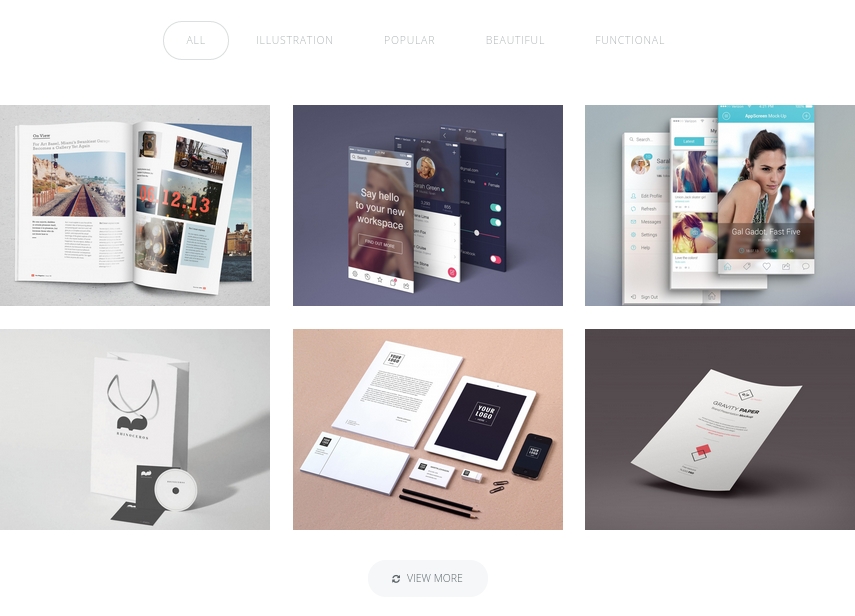
<article class="isotopeElement post_format_standard">
<div class="isotopePadding">
<div class="thumb hoverIncrease hoverTwo inited"
data-image="img/img1.jpg" data-title="Esse ckoum dolore">
<img alt="Esse ckoum dolore" src="img/img1-1170x870.jpg">
<span class="hoverShadow"></span>
<div class="wrap_hover">
<a href="img/img1.jpg" title="Esse ckoum dolore"
class="inited p-view prettyPhoto" data-gal="prettyPhoto[gal]">
<span class="hoverIcon"></span>
</a>
<a title="Esse ckoum dolore" href="#">
<span class="hoverLink"></span>
</a>
</div>
</div>
<div class="portfolioInfo">
<h4>
<a href="#">Esse ckoum dolore</a>
</h4>
<span class="infoTags">
<a class="tag_link" href="#">Illustration,</a>
<a class="tag_link" href="#">Popular</a>
</span>
</div>
</div>
</article>
Portfolio category
Filtration in portfolio block is performed in case if the filter is assigned a class of portfolio element's block you need. data-filter=".flt_46" will be filtering all the portolio elements that contains class "flt_46".
<div class="isotopeFiltr">
<ul>
<li class="squareButton active">
<a href="#" data-filter="*">All<span class="data_count">6</span></a>
</li>
<li class="squareButton">
<a href="#" data-filter=".flt_46">Illustration<span class="data_count">4</span></a>
</li>
<li class="squareButton">
<a href="#" data-filter=".flt_9">Popular<span class="data_count">3</span></a>
</li>
<li class="squareButton">
<a href="#" data-filter=".flt_8">Beautiful<span class="data_count">1</span></a>
</li>
<li class="squareButton">
<a href="#" data-filter=".flt_12">Functional<span class="data_count">1</span></a>
</li>
</ul>
</div>
Skills
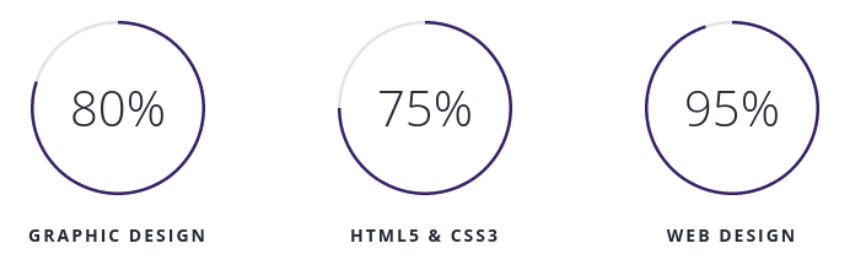
To change parameters of the pie chart you need to change values "color" and "size". directory site...js/main.js, line 6 and line 20:
... var colors = ['#392071']; ... ... size: 142 ...
To change background color of pie chart you should change the value trackColor: '#e4e4e4'. directory site...js/main.js, line 15:
... trackColor: '#e4e4e4' ...
Contact form
An e-mail of a message receiver from the contact form can be specified in the filedirectory site...include/sendmail.php, line 9:
$contact_email = 'your_mail@mail.com';
Google Map
Address for the map should be specified in site...js/map_button.js, line 23:
"address=london, baker street, 221b"
PSD Files
You will find PSD folder in our archive. PSD fiels will help change design or you may use them at your discretion.
Sources and Credits
This section discloses the sources of various files used within the theme and describes their function. Use this section to gain an understanding on how the theme functions behind the scenes if considering any type of modification.
-
Fonts:
- Open Sans (non standard)
- Fontello (non standard, icons set)
All non-standard fonts are from Google Web Fonts and Fontello icons set
We have used the pictures from:
http://www.bigstockphoto.com/
All images are copyrighted to their respective owners and not available for download with this theme.
Additional information from ThemeREX:
“Theme Rex” support team is happy to greet you here! Our operators and developers are always glad to help our customers. Should you have any questions, you may contact us for support:
10.00 – 19.00 (CET), Monday till Friday.
What is important to know about ThemeREX Support Policy
- To get a pre-purchase advice, you may post in the theme’s forum
- To get a response more promptly, you are recommended to use our Ticket-system (just click on banner “Support Sys” on the item page) Important! For correct work of Ticket-system, you mustn’t switch cookies in your browser off
- We try to answer your questions within 5-10 hours. However, if any delay occurs it doesn’t mean that we forgot about you. Some of the issues require testing and analyzing, so we could help you more profoundly
We love to intercommunicate with our customers from all over the world. We always love to explain how our themes work. However, sometimes we have to say No:
- Please, note! We do not support queries if you do not have a purchase code
- Item support does not include:
- Customization and installation services
- Support for third party software and plug-ins
How to find a purchase key (see the screenshot):
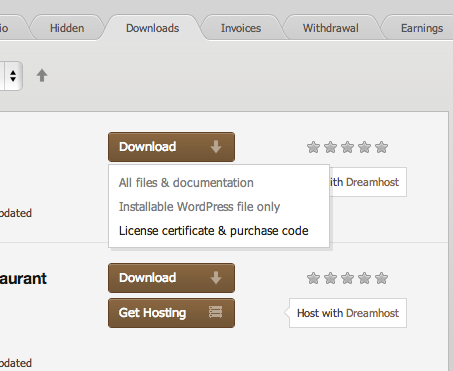
- open the ‘downloads’ tab in your account on ThemeForest
- find our theme in the list of products
- click ‘download’ button, and in the drop down meny select “license sertificate & purchase code”
Social icons
href="#" - a link to your social page <a href="http://facebook.com/themerex">
    <div class="logo_socials socPage widgetWrap">
        <ul>
            <li><a class="socialico-twitter" target="_blank" href="#"></a></li>
            <li><a class="socialico-facebook" target="_blank" href="#"></a></li>
            <li><a class="socialico-linkedin" target="_blank" href="#"></a></li>
            <li><a class="socialico-vimeo" target="_blank" href="#"></a></li>
            <li><a class="socialico-google" target="_blank" href="#"></a></li>
        </ul>
    </div>
Social Share icons
To link up the sharing social buttons, you must change <... onclick="window.open('#'); ...> to
<... onclick="window.open('https://twitter.com/share?text=TEXT-EXAMPLE'); ...>
<li class="share">
    <a class="fa fa-share-alt shareDrop selected" title="Share" href="#">Share</a>
    <ul class="share-social shareDrop inited open" style="display: block;">
        <li>
            <a href="#" class="socialico-twitter social_icons share-item"
            onclick="window.open('#'); return false;">Twitter</a>
        </li>
        <li>
            <a href="#" class="socialico-facebook social_icons share-item"
            onclick="window.open('#'); return false;">Facebook</a>
        </li>
        <li>
            <a href="#" class="socialico-google social_icons share-item"
            onclick="window.open('#'); return false;">Gplus</a>
        </li>
        <li>
            <a href="#" class="socialico-tumblr social_icons share-item"
            onclick="window.open('#'); return false;">Pinterest</a>
        </li>
    </ul>
</li>